
React Native set up in MacOS from scratch
Looking ahead to start up React Native from Scratch on MacOS and how to run on simulators so lets dive in to achieve this
Step1 : Installing IDE

Install open and create the first app

Create your first app as below or can later import the react native project which we will be creating in react native

Step 2: Installing Dependencies
(i) Enter the below command in your terminal to install HomeBrew
/bin/bash -c "$(curl -fsSL https://raw.githubusercontent.com/Homebrew/install/master/install.sh)"


(ii) Enter the below command to install node and watchman
brew install node
brew install watchman

(iii) Enter the below command to install android platform tools
brew cask install android-platform-tools

(iv) Enter the below command for installing cocoa-pods
sudo gem install cocoapods

Step 3: Creating a new react native app
(i) Open Visual Studio Code and click open folder to open the folder from your system where you need to place all your react native apps to
(ii) Select New Terminal from Terminal option from the top bar
npm install -g react-native-cli react-native
npx react-native-community/cli
(iii) Create your first project entering the below command
npx react-native init FirstProject
npm install
(iv) There are two things you need to verify before starting the app
(a) First Verify if local.properties exist under android folder of the created app
If its missing then create local.properties file in android folder of your app and then add below line in it
## This file is automatically generated by Android Studio.
# Do not modify this file -- YOUR CHANGES WILL BE ERASED!
#
# This file should *NOT* be checked into Version Control Systems,
# as it contains information specific to your local configuration.
#
# Location of the SDK. This is only used by Gradle.
# For customization when using a Version Control System, please read the
# header note.
sdk.dir=PATH_OF_YOUR_ANDROID_SDK
Path to find Android SDK :
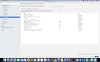
Open Android Studio get the Android SDK Location from
Android Studio -> Preferences -> Appearance & Behaviour -> System Settings -> Android SDK
Here you can copy the path provided in the box next to Android SDK Location and add to your local.properties file as such
sdk.dir = SDK PATH COPIED
(b) Check the version of distribution url in gradle-wrapper-properties
android->gradle->gradle-wrapper-properties
distributionUrl=https\://services.gradle.org/distributions/gradle-6.3-all.zip
If the version is 6.2 change it to 6.3
Step 4: Run your app in Android and iOS
(i) Run your first React Native App in Android
Make sure you have connected the android device or created a virtual device and opened the emulator from your Android Studio to run the app in
Enter the below command
npx react-native run-android
and the app launches in your emulator or the connected device
(ii) Run your first React Native App in iOS
Enter the below command
npx react-native run-ios
and the app launches in iphone
Here is the first React Native App launched in both Android and iOS

Stay tuned to my posts and do share your valuable thoughts if any queries or you would like to share anything on this topic in the comment section and please do like and share my post if this was helpful.
Hope this helped you!!


0 Comments